If you are building a new home with polished concrete floors, the slab pour is where everything starts. Getting the concrete mix, slab flatness, curing method, and control joint placement right at this stage makes the difference between a floor that polishes beautifully and one that causes problems later. Most of these decisions are easy to get right - as long as your builder knows a polished finish is the plan before the truck arrives.

This guide covers the six things your builder needs to know before pouring a slab for polishing - from concrete mix design through to scheduling the polish around other trades. If you are working with a builder in Auckland, you can share this directly with them.
Slab Flatness - The Foundation of a Good Polish
A flat slab is the single most important factor in getting a consistent polished finish. If the slab has high and low spots, the grinding process will expose more aggregate in some areas and less in others. The result is a patchy floor with inconsistent stone exposure.
Power float finishing. The slab should be power floated (machine trowelled) to create a smooth, even surface. Hand-finished slabs can be polished, but they tend to be less consistent. A power float gives the polishing team a level starting point, which means fewer grinding passes and a more uniform result.
Levelness tolerance. For a standard residential slab, aim for Class B (or better) flatness to NZS 3114. Most good concreters in Auckland will achieve this as standard practice. If your floor plan includes long open-plan runs, flatness matters even more because undulations become visible once the floor is polished and catches light.
Concrete Mix Design
The concrete mix directly affects how the finished floor will look. The size, colour, and type of aggregate in the mix is what becomes visible once the surface is ground back.

Aggregate selection. If you want a particular look - such as a salt and pepper finish with minimal stone showing, or a heavier exposure with larger decorative stones - the aggregate in the mix needs to support that. Discuss your preferred look with both your builder and your polisher before the pour. Standard greywacke aggregate gives a natural grey-toned finish. Decorative aggregates (river stone, basalt, or coloured chip) are available but need to be specified at the batching plant.
Slump and strength. A standard 25-30 MPa residential slab mix works well for polishing. Higher slump (wetter) mixes are easier for the concreters to place and finish, but excessively wet concrete can lead to a weaker surface layer. Your builder will know the right slump for the job, but make sure they are aware polishing is planned so they do not over-wet the mix on site.
Consistency across pours. If your slab requires multiple truckloads, try to use the same batch plant and the same mix for every load. Variations in aggregate colour or cement content between loads can show up as visible colour differences once the floor is polished. This is not always avoidable on large pours, but it is worth managing.
Curing Practices - What to Do and What to Avoid
How the slab is cured in the first 28 days has a significant effect on surface hardness and polishability.
No curing compounds. This is the most common issue. Some builders apply chemical curing compounds to the slab surface to retain moisture during curing. These compounds create a film on the concrete that needs to be ground off before polishing can begin. That adds time, cost, and an extra grinding pass that could have been avoided. If polishing is the plan, ask your builder to cure with water or wet hessian instead.
Water curing is ideal. Keeping the slab moist for the first 7 days (by spraying with water or covering with damp hessian and plastic) produces a harder surface. A harder surface polishes better and holds a finish longer - you can expect 20+ years with good maintenance.
Minimum 28 days before polishing. Concrete needs a full 28 days to reach its design strength before grinding should begin. In practice, most new builds give the slab well over this - by the time framing, roofing, cladding, lining, and painting are finished, the slab has usually had two to four months. More than enough.
Control Joint Placement
Control joints (also called contraction joints or saw cuts) are cut into the slab to control where cracking occurs. They are a necessary part of every concrete floor, but where they go affects the look of the finished polished surface.

Plan joints with the final layout in mind. Control joints are permanent features of the floor. Once cut, they cannot be removed. Work with your builder to place them where they will be least visible or where they align with natural room boundaries - under walls, along doorways, or in areas that will be covered by cabinetry.
Involve your polisher early. DSC can advise on joint placement before the pour. A quick conversation at this stage can prevent a joint running through the middle of your open-plan living area where it will be visible every day.
Joint filling. After polishing, the control joints are typically filled with a semi-rigid polyurethane filler that matches the floor colour. This gives a clean, finished look. The joints do not disappear entirely, but they become a tidy design line rather than a rough saw cut.
Timing With Other Trades
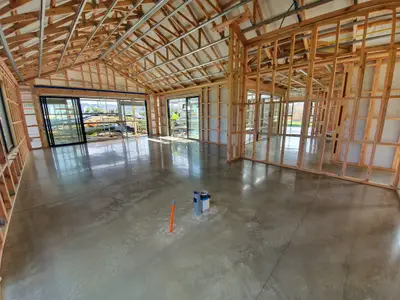
This is where most confusion happens on a new build. The polishing needs to slot into the construction sequence at exactly the right point.
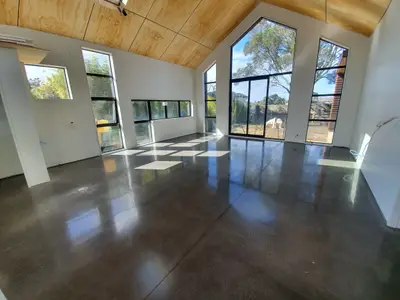
Polish before paint, and ideally before plaster (gib stopping). This is the critical sequence. Once the building is weathertight and gib lined, the polishing team has a clean, open shell to work on - no painted walls to protect, no fresh stopping to damage, and no fixed surfaces to mask off. Polishing before paint is the rule. Polishing before plaster is even better when the build sequence allows. Skirtings, kitchen, bathroom and joinery always go in AFTER polishing. For the full construction timeline breakdown, see our build timing guide.
Why skirtings must wait. If your builder is doing a heavier grind - taking roughly 5mm off the surface - any skirtings installed before polishing will end up looking like they are floating above the floor. The grinder removes material from the slab, lowering the floor level. Skirtings and cabinetry should always go in after polishing so they sit flush against the finished surface.
Layout complexity matters. Open-plan homes are relatively straightforward for the polishing team. But complex layouts with lots of separate rooms, tight hallways, and multiple doorways are significantly harder to polish once paint is on the walls. Every wall, doorframe, and corner becomes a surface DSC has to protect. All the risk of damage to walls, doorframes, and painted surfaces falls on DSC, which adds time and care to the job. If your home has a complex layout, getting the timing right is even more important.

Moisture Barriers
A properly installed moisture barrier (damp-proof membrane or DPM) under the slab is standard practice in New Zealand and is required by the Building Code. For polished concrete, it is especially important.
Why it matters for polishing. Without an effective moisture barrier, water vapour from the ground can migrate up through the slab. This moisture can cause white efflorescence marks on the polished surface, interfere with densifier penetration during polishing, and create ongoing haze or discolouration. A good DPM prevents all of this.
Standard practice. Most builders in Auckland install a polythene DPM as standard. Just make sure it is properly lapped and sealed at all joints and edges. If the slab is being poured on a site with high water table or poor drainage, consider upgrading to a heavier-gauge membrane.
What Finish to Expect
Once the slab is poured correctly and the polishing team has a good surface to work with, the finish options are straightforward.
Semi-gloss (satin) is the default recommendation. It is the sweet spot for residential floors - enough sheen to look polished without showing every footprint. It is also more resistant to staining and wear than a matte finish, while being less maintenance-intensive than a high gloss. DSC uses the same process across the entire floor, so the result is consistent from room to room.
For a full comparison of finish levels, see our polished concrete cost guide, which includes pricing by finish type and floor size.
Frequently Asked Questions
How much does polished concrete cost for a new build?
For a standard new build with an open slab (50-70m2), expect to pay around $100 per m2 + GST. Larger floors (70-200m2) typically come in at $80-$100 per m2 + GST. These prices assume polishing happens at the empty shell stage before skirtings and cabinetry are installed. Full pricing details are in our Auckland pricing guide.
Does the concrete mix matter for polishing?
Yes. The aggregate type, size, and colour determine the look of the polished floor. Standard greywacke gives a natural grey finish. Decorative aggregates can be specified for a different look, but they need to be ordered at the batching plant before the pour - not after.
Can I use curing compounds on a slab that will be polished?
It is best to avoid them. Chemical curing compounds create a film on the surface that must be ground off before polishing, adding cost and time. Water curing or wet hessian is the better option for slabs destined for polishing.
When should I get the polisher involved?
As early as possible - ideally before the slab is poured. DSC can advise on mix design, control joint placement, and curing method. A quick conversation before the pour prevents costly issues later. At minimum, book the polishing window into your construction schedule before the build starts.
How long does the slab need to cure before polishing?
A minimum of 28 days is required. In practice, most new builds give the slab well over 28 days before the polishing stage is reached, because framing, roofing, cladding, and lining work takes time. If your build is moving fast, let DSC know and we can test whether the slab is ready.
Should the builder power float the slab?
Yes. Power floating (machine trowelling) produces a smoother, more consistent surface that is ideal for polishing. Hand-finished slabs can be polished, but they tend to be less even. Most concreters in Auckland will power float as standard on residential slabs.
What finish level do you recommend for new builds?
Semi-gloss (satin) is the default recommendation for residential floors. It has enough sheen to look great without showing every footprint, and it resists staining and wear better than a matte finish. DSC uses the same process across the whole floor for a consistent result.