The most common builder mistakes with polished concrete floors are wrong build-sequence timing, poor slab finishing, and installing skirtings before the floor is ground and polished. Every one is avoidable if the builder knows from day one the floor will be polished.

About this guide. Bowie Houston is the director of Diamond Shine Concrete and has been grinding and polishing concrete floors across Auckland for 14 years. The mistakes below come from real jobs where a small miscommunication early in the build created expensive rework later.
Last reviewed: June 2026 | Author: Bowie Houston, Director, Diamond Shine Concrete
The Most Common Mistakes at a Glance
This table covers the big ones. Each section below goes into detail on what goes wrong and how to fix it.
| Mistake | Consequence | Fix |
|---|---|---|
| Builder not told the floor will be polished | Wrong slab spec, wrong timing, wrong sequence | Tell the builder at concept stage, before the slab is poured |
| Poor slab flatness or finish | Heavier grind required, higher cost, limited finish options | Specify flatness tolerance and power-float finish in slab brief |
| Polishing scheduled after paint | Slower job, higher cost, risk of damaging painted walls | Lock in the polishing slot before paint; ideally before plaster |
| Skirtings installed before polishing | Skirtings look like they float above the finished floor | Skirtings and cabinetry go in after polishing, not before |
| Self-levelling compound applied to uneven areas | Cannot be polished over; risk of cracking and delamination | Fix unevenness with grinding, or use a structural concrete topping |
| No floor protection after polishing | Fresh polish scratched or contaminated by following trades | Protect immediately after polishing; use breathable padding, not plastic |
Mistake 1: Not Telling the Builder
This is the biggest one. If the builder does not know the floor is being polished, they make reasonable decisions for a tiled or carpeted floor - and those decisions cause problems for polishing.
The slab spec is one example. A slab poured for carpet needs a basic broom finish. A slab for polishing needs a power-floated surface with good flatness tolerance. If that information does not reach the concretor, you get a slab that needs a heavier grind to correct problems that should never have existed.
Timing is another example. Builders default to scheduling finish work late in the programme. On a carpeted floor that is fine. On a polished floor, polishing needs to happen after the house is weathertight and gib is lined, ideally before plaster (gib stopping), and definitely before paint. A builder who does not know that will schedule polishing last, which means working around completed walls, painted surfaces, installed skirtings, and cabinetry.
The fix: Have the polishing conversation at the start. Before the slab is poured, tell your builder the floor will be mechanically polished. That single sentence shapes the slab spec, the programme slot, and the sequence for every finishing trade that follows.
For a detailed walkthrough of the correct sequence, see our guide on when to polish during a new build.
Mistake 2: Poor Slab Flatness and Finish
The quality of the slab dictates how much grinding is required and what finishes are achievable. This is something most homeowners do not realise until they get a quote and find the spec they wanted is not achievable on the slab they have.
A well-finished, flat slab opens up the full range of options - including a lighter grind with a fine salt-and-pepper finish. An uneven slab with a rough surface needs heavier grinding to level it, which means deeper aggregate exposure and a longer job.
Typical flatness issues we see:
- High spots and low spots across the span, often from form board settlement or inconsistent floating
- Ridges at the boundary between pours (where a slab was cast in sections)
- Surface contamination from curing compounds, builder's mix, or dust that bonded into the surface during curing
Grinding handles mild-to-moderate unevenness - routinely 3-5mm off the high points, up to around 8mm comfortably. Beyond that, the floor may need a structural concrete topping (25-50mm thick) before grinding and polishing can proceed. A topping is a proper repair; self-levelling compound is not - see Mistake 5 below.
The fix: Brief the concretor on polishing. Key requirements: power-float finish, flatness tolerance within 3mm over 3m, and no curing compounds that cannot be ground off. Have the concretor on the same page as the polisher.
Mistake 3: Wrong Timing in the Build Sequence
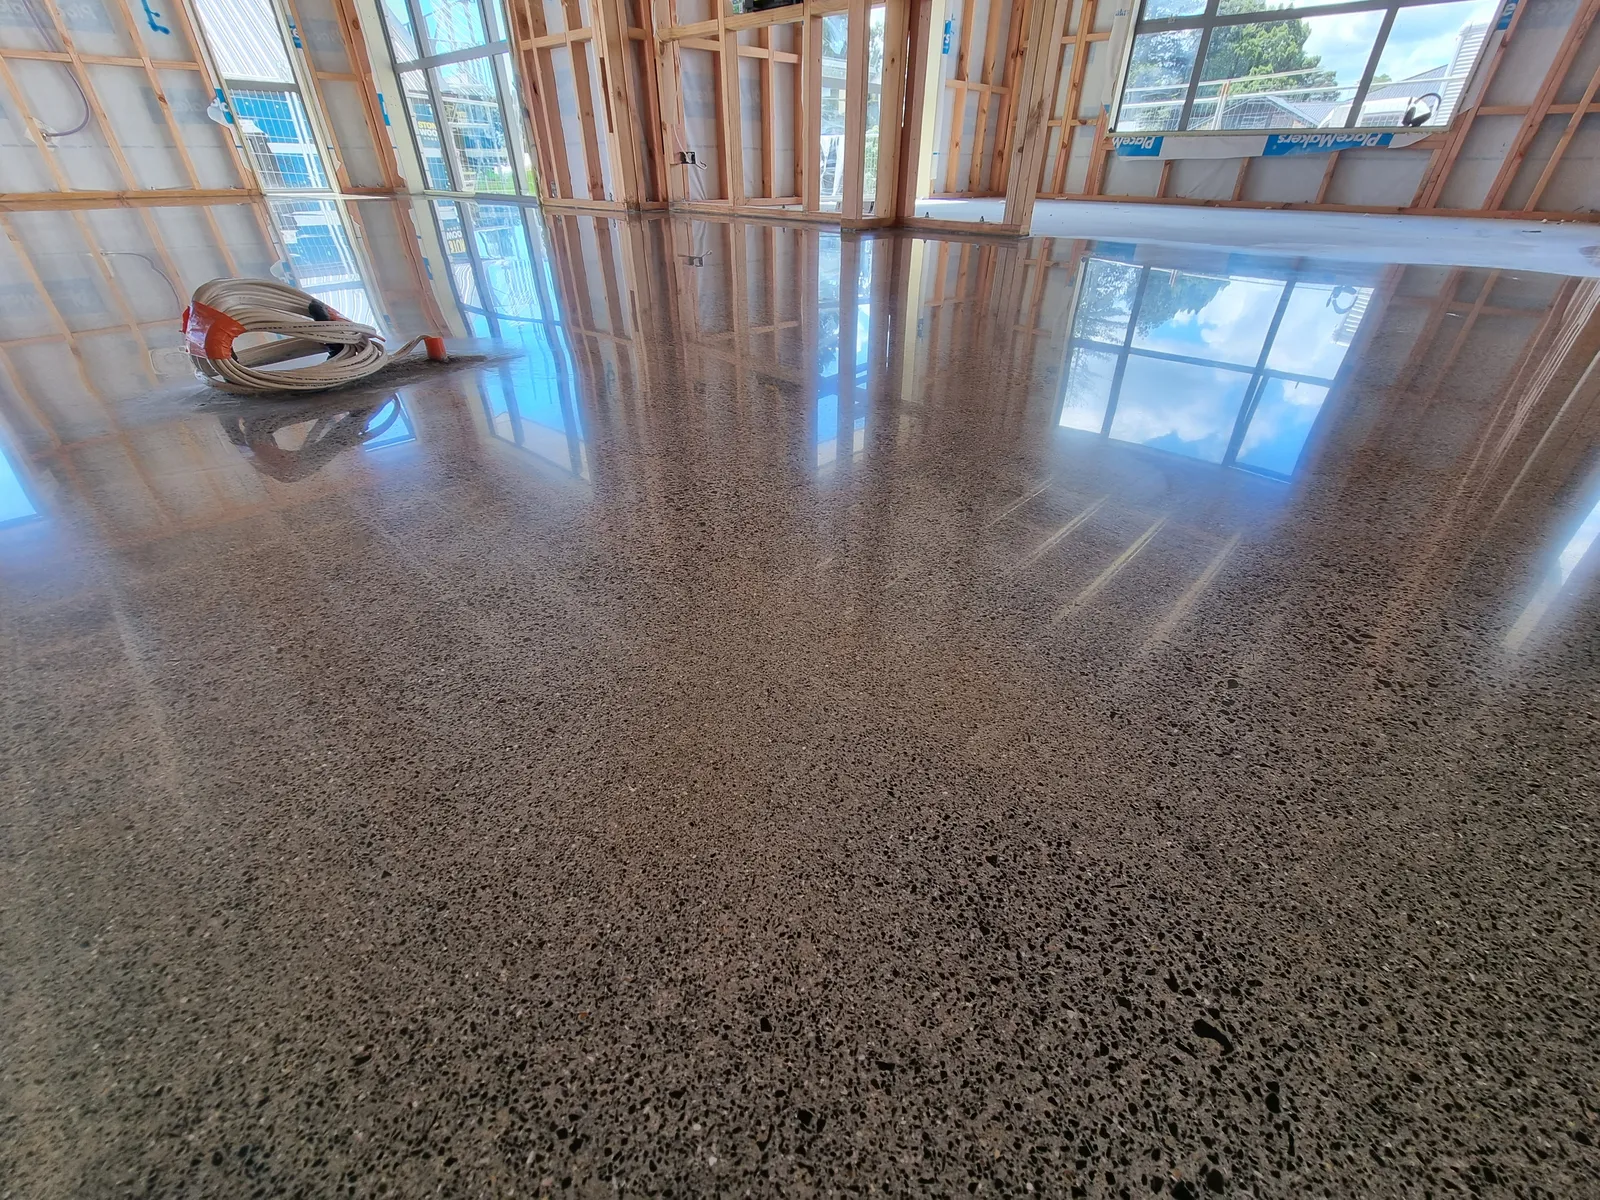
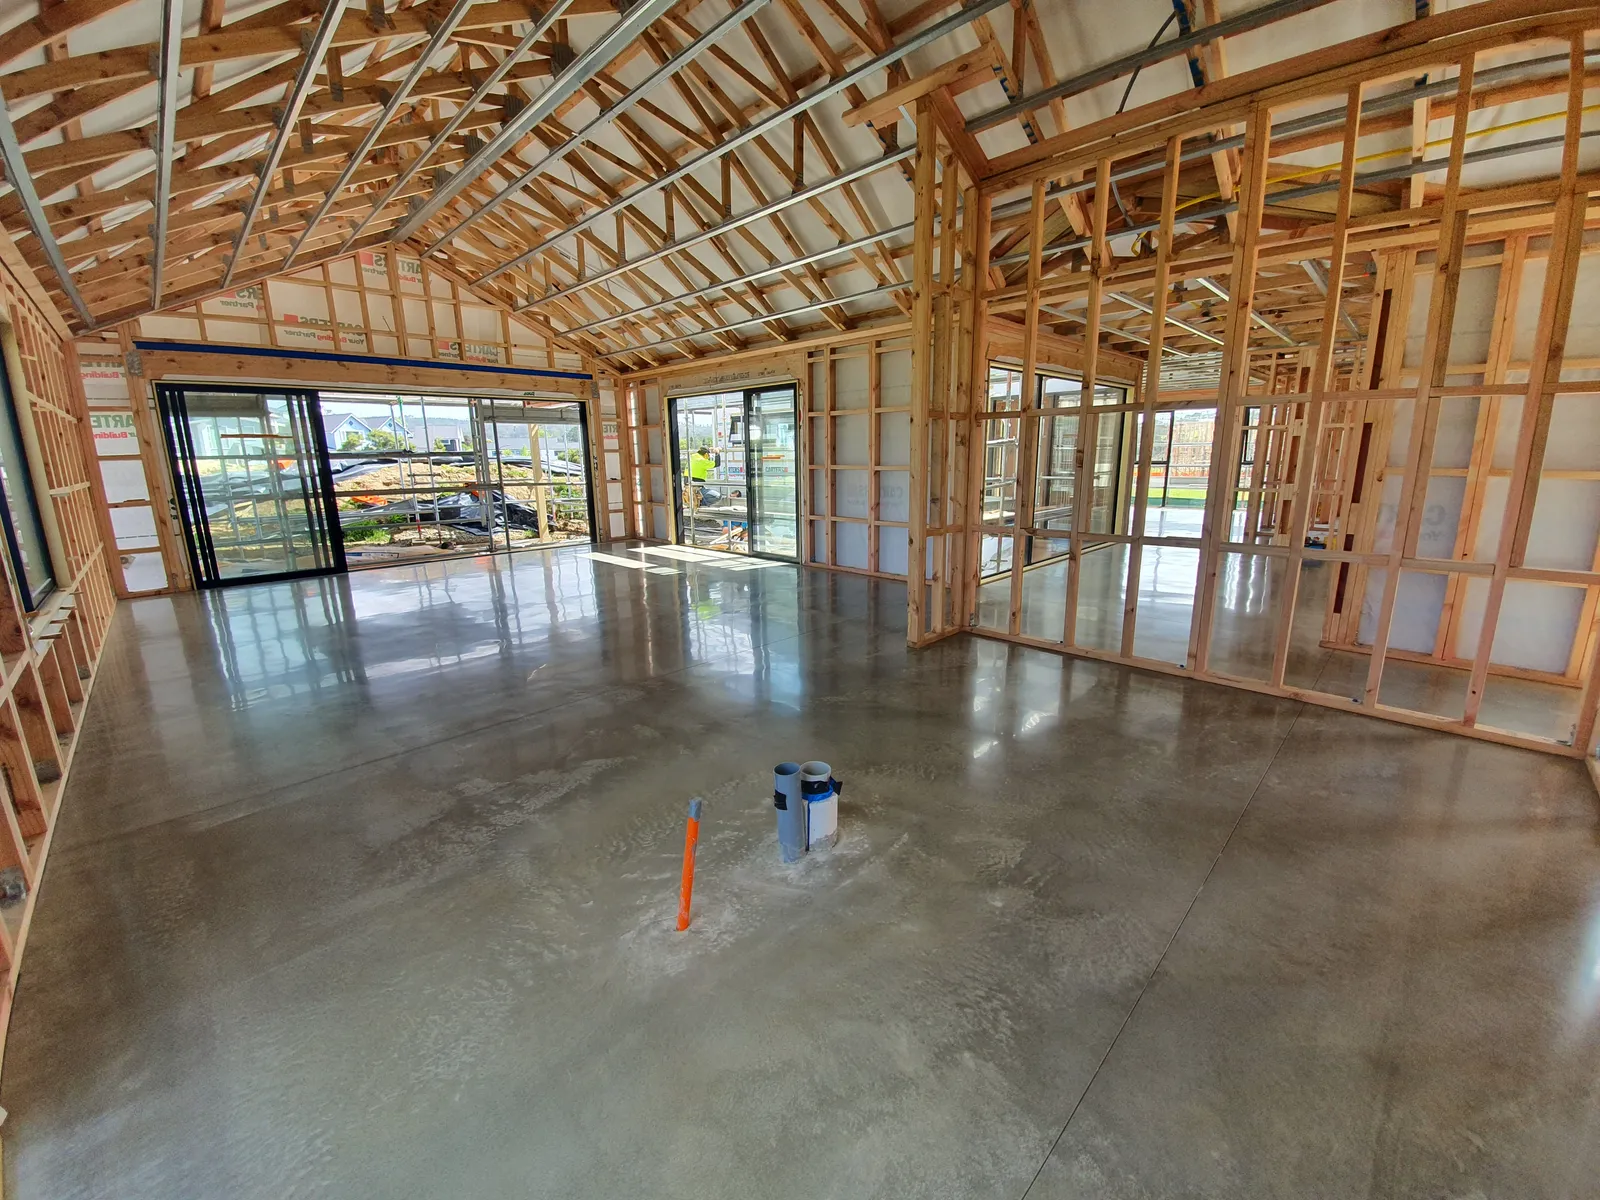
The grinding and polishing process is not a final buff at the end of the build. It involves heavy machinery that cuts material off the floor, produces fine dust, and uses water. The right window in the build programme matters.
The correct sequence:
1. Slab poured and cured (allow 28+ days before grinding) 2. House weathertight - frame, roof, and wrap complete 3. Gib lined (gib board up, joints not yet stopped) 4. Grind and polish - ideal window (before plaster, no risk of dust or splash on fresh stopping) 5. Gib stopping and plastering 6. Grind and polish - acceptable window (after plaster, before paint) 7. Paint 8. Skirtings, cabinetry, doors (AFTER polishing)
The rule that cannot move is: polishing must happen before paint. After paint is on the walls, grinding dust and water splash become a real problem. Protecting finished walls and freshly painted surfaces slows the job significantly and adds cost. It can be done, but it should not be the plan.
Polishing before plaster is the preferred option when the programme allows it. We can work freely without worrying about damaging fresh stopping, and the plasterer comes in after us onto a protected surface.
For complex homes with many rooms and tight hallways, the before-plaster window is more important. Once paint is on the walls in those builds, the protection setup is expensive and the risk of wall damage is real.
See our full explanation of whether to polish before or after gib stopping for the programme detail.
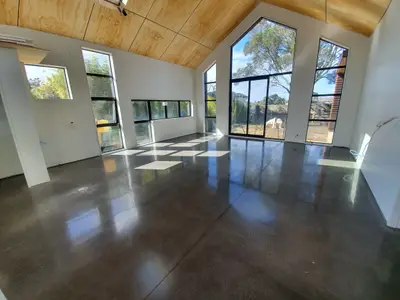
Mistake 4: Installing Skirtings and Cabinetry Before Polishing
This is the mistake that causes the most visible, expensive rework. Skirtings and cabinetry must go in after polishing - not before.
Here is why. The grinding and polishing process removes material from the slab surface. A medium or heavy grind can take 3-5mm off the floor. If skirtings are already installed at the correct height when that material is removed, the bottom of the skirting is now 3-5mm above the polished surface. That gap is obvious. The skirtings look like they are floating above the floor.
The fix is either to accept the gap, rip the skirtings out and refit them at the new height, or cut a fillet strip to fill the gap. None of those options are good. All of them cost money and time.
The same logic applies to kitchen cabinetry. If the base of a kitchen island or lower cabinet is set to floor height before polishing, you either grind around it (which leaves an unfinished edge) or remove and refit the cabinet after polishing. We have seen both outcomes on real jobs.

DSC uses the same grinding and polishing process across the whole floor - there is no special edge treatment or reduced-depth pass near walls. Every part of the floor gets the same result.
The fix: Simple instruction to all finishing trades - skirtings, cabinetry, door hardware, and any fixed floor-level fixtures go in after polishing. Include this in the build programme.
Mistake 5: Using Self-Levelling Compound on the Slab
Self-levelling compound is a common builder's fix for an uneven floor. It pours out, levels itself, and sets. For tiled or carpeted floors it works fine. For polished concrete it is not an option.
The problem is machine weight. The grinders we use are heavy - even the lightest is around 500kg. Running that weight over a few millimetres of weaker self-leveller leads to cracking, delamination, and failure over time. We do not polish over self-levelling compound.
If a slab genuinely needs self-levelling compound to fix the unevenness, the floor is not suitable for mechanical polishing. The realistic path is either:
- Fix the unevenness with grinding (mild-to-moderate unevenness only, within the tolerances above)
- Apply a structural concrete topping (25-50mm thick) - which DSC can grind and polish once cured
- Accept that the floor will be tiled, carpeted, or another system that works with self-leveller
The fix: If a builder or concretor mentions self-levelling compound and the plan is to polish, stop and call us first. We can assess the slab and advise on the correct repair path.
Mistake 6: No Protection After Polishing
We have polished floors that were scratched the next morning because the next trade on site walked across with a tool bag. A freshly polished concrete floor needs to be protected immediately after we leave.
What good protection looks like:
- Breathable cardboard or felt padding, taped flat to the surface
- Do NOT use plastic sheeting directly on the floor - it traps moisture and can cause surface issues
- Keep the covered floor protected until the last possible trade has finished
- Brief every trade on site that the floor is protected and must not be walked on without protection
The protection step is the builder's responsibility once we hand the floor over. We will always flag it before we leave site, but it needs to be in the builder's handover checklist.
The fix: Before leaving site, ensure breathable cardboard or felt padding is taped flat across the entire polished surface. Brief every remaining trade that the floor is protected and must not be walked on without that protection in place. Make it a line item in the builder's handover checklist.
How Much Does Polishing a New Build Floor Cost?
For a typical residential new build floor (50-70m2), expect around ~$100 per m2 + GST. Larger open-plan floors (200m2+) come down to around ~$60 per m2 + GST. Detailed work in finished homes sits at the higher end: $120-$130 per m2 + GST.
Mistakes in the build sequence push the cost up. Polishing around installed cabinetry, protecting freshly painted walls, and correcting slab flatness problems all add time and cost that would not exist if the sequence was right.
For the full breakdown by floor size, finish type, and job complexity, see our polished concrete cost guide for Auckland.
FAQ
Q: What should I tell my builder before the slab is poured?
Tell them the floor will be mechanically polished. From that one sentence, the key instructions follow: power-float finish, flatness within 3mm over 3m, no curing compounds that cannot be ground off, and the polishing slot booked before paint.
Q: Can polishing still happen if the slab is not flat?
Yes, in most cases. Grinding handles mild-to-moderate unevenness - typically 3-5mm off the high points and up to around 8mm comfortably. Beyond that, a structural concrete topping may be required. We assess the slab on arrival and do a sample grind before committing to the final cut.
Q: How long before polishing does the slab need to be poured?
Allow 28+ days of curing before grinding begins. The house also needs to be weathertight before we start - no rain landing on the slab during or after polishing.
Q: What if the builder has already installed skirtings?
If skirtings are already in and polishing has not happened yet, the options are: remove the skirtings, grind and polish, and refit (cleanest result); grind and polish around them and accept a finished edge line; or in some cases cut fillet strips to fill the gap after polishing. None of these are as clean as doing it in the right order. Talk to us before the builder starts on skirtings.
Q: What does polishing cost on a typical new build?
For a 50-70m2 new build floor, expect around ~$100 per m2 + GST. Larger open spans (200m2+) come down to around ~$60 per m2 + GST. A finished home with detailed work and tight access sits at $120-$130 per m2 + GST. Jobs where we have to work around installed cabinetry, protect painted walls, or correct slab flatness issues will cost more. Getting the sequence right avoids those extras.
Q: Does DSC do anything different near walls, steps, or doorways?
No. We use the same grinding and polishing process across the entire floor. There is no special edge treatment, transition pass, or reduced-depth area near walls or steps. This is why the sequence matters - every part of the floor gets the same result, and trade installation order needs to accommodate that.
Talk to Diamond Shine Concrete
Planning a new build with a polished concrete floor? The best time to talk to us is before the slab is poured. We can advise on the slab spec, the programme slot, and what the builder needs to know. Have a look at our grinding and polishing services for the full process, or get in touch for a free site visit and quote. We polish new build floors across Auckland, the North Shore, East Auckland, West Auckland, and South Auckland.