A polished concrete floor that looks dull, worn, or cloudy after 10-12 years is not a write-off. In most cases it can be restored through a staged process: assess and sample grind, regrind and polish through the grits, re-densify, and reseal.
The floor you get back is not identical to a new pour, but it should look sharp, clean, and solid for another decade with proper care. This guide walks through each step of the grinding and polishing restoration process and what to expect at each stage.

About this guide. We restore older polished concrete floors every month across Auckland, the North Shore, and East and South Auckland. The process described here is based on 14 years of hands-on grinding and polishing work, written by Bowie Houston.
Last reviewed: June 2026 | Author: Bowie Houston, Director, Diamond Shine Concrete
What Happens to a Polished Floor Over 10-12 Years
Mechanically polished concrete gets its shine from the final polishing grits - the surface is taken through a sequence of progressively finer diamonds, finishing at 200-400 grit (satin to semi-gloss) or beyond. Over a decade of foot traffic, that ultra-fine surface gets micro-scratched. Grit tracked in from outside, furniture movement, and everyday cleaning take their toll. The concrete itself is unchanged. It is only the top fraction of a millimetre that has lost its polish.
Beyond that, a 12-year-old floor may have several other conditions worth understanding before work starts:
| Issue | What it looks like | What it means |
|---|---|---|
| General dullness or haze | Flat, milky appearance across walkways | Normal wear - regrind removes this |
| Deep micro-scratching | Visible lines or scuffs in high-use areas | Heavier grind needed in those zones |
| Localised discolouration | Darker or paler patches near doors | Old spills or differential wear - usually removed by the regrind |
| Exposed joint lines | Visible crack-fill from the original job | These remain after restoration - expected |
| Surface crazing | Fine network of hairline cracks | Structural (in the slab itself) - polishing improves appearance but does not change the cause |
The restoration process handles the first three. Joint lines and surface crazing are slab characteristics that will still be visible after the work is done.
Step 1 - Assess and Sample Grind
Before any machine touches the floor, we assess what we are dealing with. This means walking the whole area, looking at light raking across the surface, and identifying zones of different wear.
We then carry out a sample grind - a small test area using a moderate grind depth. This is the most important step in the whole process because older floors are unpredictable. The slab may have aggregate differences across it, old repairs that respond differently to grinding, or patchy hardness from age and moisture history. The sample grind shows how the floor actually responds before we commit.
You get to see the sample result before we proceed. This is the moment to align on what the finish will look like - particularly if the floor has colour variation or aggregate that may be more visible at a deeper grind.
Step 2 - Regrind to Remove the Worn Layer
Once the sample grind is agreed, we run the full restoration grind. For a 12-year-old residential floor, this is typically a medium grind - enough to cut below the worn, micro-scratched surface layer and expose fresh concrete. How deep we go depends on what the slab demands.
The grinding process works through progressively finer metal-bond diamonds, starting coarse enough to cut the worn surface and stepping up through intermediate grits. This is what separates a proper restoration from a rebuff - a rebuff only works the final polish grits on a surface that has not worn through. A restoration regrind starts further back in the process.
For a floor with deeper damage - heavy scratches, staining that has penetrated the surface, or areas worn right through the polish - we go coarser. For a floor that is mostly dull from general wear with only minor surface issues, a lighter cut is enough.
What happens to marks and stains during the regrind:
Grinding mechanically removes the worn layer, so most surface-level discolouration comes up with it. Old spill stains that have not penetrated deeply into the slab body are typically removed in this stage. Stains that have soaked deeper - particularly in older or more porous concrete - may lighten significantly but not disappear entirely.
Step 3 - Polish Through the Grits
Once the regrind is complete, we step through resin-bond diamonds from coarse to fine, with each pass removing the scratch pattern from the one before it. For most residential restorations the target is satin to semi-gloss - roughly 200-400 grit - because this range shows wear less obviously than high-gloss and is easier to maintain. Satin (~200 grit) and semi-gloss (~400 grit) are distinct adjacent levels; we confirm the target on site during the sample grind.
If the original floor was high-gloss and you want to come back down to satin or semi-gloss, restoration is the right moment to make that change.

Steps 4 and 5 - Densify, Then Reseal
After the grinding stages and before the final polish, we apply a concrete densifier. It reacts with calcium hydroxide in the slab to harden and tighten the surface, helping it take and hold the final polish. Older concrete tends to accept densifier evenly and the result is often very clean.
Once the final polish is complete, we apply a penetrating sealer. This soaks into the concrete rather than forming a film on top, providing oil and moisture resistance without changing the look or feel of the floor. For a 12-year-old floor this is often the first sealer refresh since the original installation, and it makes a real difference to day-to-day maintenance.
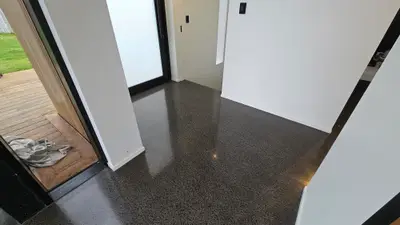
What the Finished Floor Looks Like
The restored floor is not identical to when it was new. The aggregate character of the slab - the colour, the stone sizes, any historical variation in the concrete - becomes more visible after a deeper cut. Most clients consider this an improvement: older aggregate-exposed floors have a warmth and texture that newer work sometimes lacks.
If you want a perfectly uniform, zero-variation floor, polished concrete on an older slab may not be the right option - the honest answer is that the slab's character shows through. Joint fills and historical repairs will still be detectable after restoration, though we can fill and flush pronounced ones as part of the process.
Overall: a properly restored 12-year-old floor looks genuinely good. Not brand new, but solid, sharp, and noticeably better than the tired surface it was before. A typical residential regrind and repolish takes 3-5 days and the floor needs 24 hours before foot traffic after the sealer is applied.

Restoration vs a Rebuff - Which Does Your Floor Need?
Not every dull floor needs a full regrind. A rebuff (re-polishing the final grits only, no regrind) is right when the floor is under 8-10 years old, mostly dull from normal wear, and has no deep scratches. The wet-cloth test helps: if the surface looks brighter wet but dulls again as it dries, a rebuff usually fixes it.
A restoration regrind is the right call when the floor is 10+ years old with wear throughout, has deep scratches or staining that a rebuff cannot reach, or has already had a rebuff that did not satisfy. For a 12-year-old floor with general wear, the regrind is almost always the better choice - it lasts longer and looks genuinely better.
Our grinding and polishing services page covers what is included in the full process. For the cost side, see our restoration cost guide. This article covers the process; that one covers the numbers.
Frequently Asked Questions
What does it cost to restore a polished concrete floor in Auckland?
A restoration regrind is typically $60-$100 per m2 + GST, depending on the floor size and the degree of work required. A rebuff (light restoration, no regrind) is $30-$50 per m2 + GST. The full cost breakdown, what affects the quote, and worked examples are in our restoration cost guide.
Can every old polished concrete floor be restored?
Most can be restored to a good condition. The main limitation is the slab itself - if the concrete has significant structural cracking, deep ghost marks from old tiles, or severe porosity from very old mix designs, those characteristics will still be visible after the best restoration work. We always do a sample grind first so you can see the result before committing.
Will the floor look the same as when it was first polished?
Similar, but not identical. The aggregate character of the slab - colour variation, stone sizes, any historical patches - may be slightly more visible after a regrind than it was in the original polish. Most clients consider this an improvement. Perfectly uniform floors are rare on older slabs; what you get is a floor with honest character.
How long will it last after restoration?
Mechanically polished concrete lasts 20+ years with good maintenance. After a restoration regrind, you are effectively resetting the surface wear cycle. Most floors will not need major work again for another 8-12 years with proper care. A rebuff at the 4-6 year mark will keep the surface fresh in between. See our polished concrete longevity guide for the full picture.
Can the finish be changed during restoration?
Yes. Restoration is the natural point to adjust the sheen level if you want to. The most common request is moving from high-gloss down to satin or semi-gloss - either because the original high-gloss was hard to maintain or because the preference has changed. Let us know before the sample grind so we can confirm the target.
What should we do to maintain the floor after restoration?
The same rules as a new floor: sweep or vacuum regularly, use pH-neutral cleaner only, put door mats at every entrance, and plan for a rebuff at the 4-6 year mark. Avoid acidic cleaners (vinegar, lemon, citrus-based products) - they etch the polished surface. See our article on why polished floors go dull and how to avoid it for the full maintenance guide.
Talk to Diamond Shine Concrete
Got an older polished concrete floor that needs attention? We restore floors across Auckland, the North Shore, East Auckland, West Auckland, and South Auckland every week. Have a look at our grinding and polishing services to understand what the full process involves, or get in touch for a free site visit and quote.